Showing posts with label japanese. Show all posts

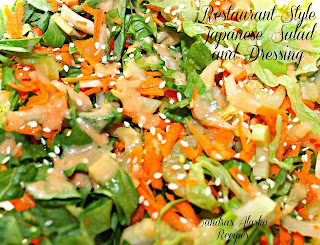
SANDRA'S JAPANESE RESTAURANT-STYLE SALAD and DRESSING

This light and flavorful salad n' dressing tastes very similar to major Japanese
chain restaurants and pairs stupendously with Asian main dishes...


Prep: 15 Mins.
Servings: (6 to 8)

INGREDIENTS:

Dressing (Yields 1-1/2 cups):
1/2 cup finely chopped sweet white onion
1/2 cup canola oil
2 tablespoons water
2 teaspoons ground ginger (or 2 tablespoons freshly grated)
2 tablespoons minced celery
3 tablespoons ketchup
1/4 cup low-sodium soy sauce
2 tablespoons honey
2 teaspoons freshly squeezed lemon juice
1/2 teaspoon granulated garlic
1/2 teaspoon fine-grain sea salt
1/2 teaspoon freshly ground black pepper

Sandra's Restaurant-Style Japanese Salad Dressing
(Click for recipe)...
Salad:
1 bunch heart of romaine, sliced into 2-1/2" x 1/4" strips
1 carrot, shredded
3 celery ribs, thinly sliced on the diagonal


Garnish:
--Toasted sesame seeds

METHOD:

Add all dressing ingredients in order listed in blender.  Place lid on top, and blend on high speed for a minimum of 30 seconds, until dressing is smooth. Let dressing stand a minimum of 4 hours in refrigerator for flavors to meld before serving.

Add all salad ingredients to a medium glass bowl, and toss to combine. (I like to place the salad in the refrigerator for about 15 minutes to ensure it is cold prior to serving.)

When preparing individual servings of salad, top each with a light drizzle of dressing and a sprinkling of sesame seeds. ~ Enjoy!

SANDRA'S RESTAURANT-STYLE JAPANESE SALAD DRESSING

For a fast and easy Japanese dressing recipe tasting super similar
to those found in top-notch Japanese restaurants ~ This one's for you!


Yields: (1-1/2 cups)
Prep: 5 Mins.

INGREDIENTS:

1/2 cup finely chopped sweet white onion
1/2 cup canola oil
2 tablespoons water
2 teaspoons ground ginger (or 2 tablespoons freshly grated)
2 tablespoons minced celery
3 tablespoons ketchup
1/4 cup low-sodium soy sauce
2 tablespoons honey
2 teaspoons freshly squeezed lemon juice
1/2 teaspoon granulated garlic
1/2 teaspoon fine-grain sea salt
1/2 teaspoon freshly ground black pepper

METHOD:

Add all ingredients in order listed in blender.  Place lid on top, and blend on high speed for a minimum of 30 seconds, until dressing is smooth. Let dressing stand a minimum of 4 hours in refrigerator for flavors to meld before serving. ~ Enjoy!

Sandra's Japanese Restaurant-Style Salad
(Click for recipe)...
~~~~~~~~~~~~
Tip: Store dressing in refrigerator in a tightly covered glass container for up to 1 week. It's also fab as a condiment on hoagie roll and grilled sandwiches...or, as a dip for veggies (quite a thin dressing, but I like it that way as it's not supposed to be thick: FYI)

SANDRA’S SPRING ASIAN SWEET PEA GREEN SALAD with HONEY-LIME DRESSING

I created this vibrant and crunchy salad today,
mainly from "green" ingredients I had on hand;
it’s superb and will fare well alongside any main dish...
Servings: (8 to 10)
Prep: 10 Mins.

INGREDIENTS

Dressing:
4 tablespoons mayonnaise
1 tablespoon honey
2 teaspoons freshly-squeezed lime juice

Salad:
6 cups romaine lettuce, torn
1-1/2 cups frozen sweet green peas, thawed, and pat dry
1 (8 oz. can) sliced water chestnuts, drained, pat dry, and cut into slivers
3 ribs celery, diagonally sliced
4 long green onions (green parts only), sliced
Handful of fresh parsley, chopped
--(Or, 2 tablespoons dried parsley)

Garnish:
--Toasted sesame seeds

METHOD

In a medium glass (or non-reactive) bowl, add and whisk together all the dressing ingredients. Toss in all salad ingredients, and fold to combine. To serve, sprinkle with toasted sesame seeds. ~ Enjoy!


~~~~~~~~~~~~~~

I served this salad for lunch with homemade meatloaf, and smashed potatoes with sour cream and chives topped with mushroom-sage gravy. We'll also have this same salad this evening for dinner with barbecue pulled pork burgers.

SANDRA’S ASIAN SLOW-COOKER TERIYAKI CHICKEN

A perfect dinner to quickly throw together
either in the morning and slow cook on low for 8 hours,
or during your lunch hour and slow cook on high for 4 hours...

Servings: (6 to 8)
Prep: 10 Mins.
Slow Cook: High 4 Hrs, or Low 8 Hrs.; + Broil: 3-5 Mins

INGREDIENTS:

Chicken:
1 yellow onion, cut into wedges
6 bone-in skin-on chicken thighs
1-½ cups brown sugar
½ cup low-sodium soy sauce
½ cup low-sodium chicken broth
2 tablespoons hoisin sauce (An Asian type of barbecue sauce)
1-inch piece of fresh ginger, grated (or 1 teaspoon ground ginger)
2 garlic cloves, minced
½ teaspoon freshly ground pepper

Garnish:
1 tablespoon fresh parsley, chopped
1 tablespoon toasted sesame seeds

--Prepared steamed rice
--Prepared garden salad

METHOD:

In mixing bowl, combine brown sugar, soy sauce, chicken broth, hoisin sauce, ginger, garlic, and pepper, then set aside.

Place onion wedges in bottom of slow cooker, chicken thighs on top, and pour teriyaki mixture over chicken.

Cover slow cooker and cook on high-heat setting for 4 hours, or low-heat setting for 8 hours.

Transfer chicken thighs skin side up to a broiler using a slotted spoon.  Pierce chicken skin with a paring knife.  Broil teriyaki chicken in oven on top rack position until brown and crispy, about 3 to 5 minutes.

Sprinkle teriyaki chicken thighs with parsley and sesame seeds, then serve with prepared steamed rice and a nice garden salad. ~ Enjoy!

SANDRA’S ALASKA SMOKED SALMON SUSHI SQUARES

An incredible salmon sushi
that is now my all-time favorite creation
and I'm positive most all of you will enjoy...

Yields: (4 Sushi logs, cut into 16 total squares)
Prep: 15 Mins.; plus preparing sushi rice ahead of time

INGREDIENTS

Sauce:
1 tablespoon mayonnaise
1/2 teaspoon Wasabi paste

Layers:
3 cups cooked and cooled sushi rice
--(Click here for recipe:  Sandra's Easy Sushi Rice)
Furikake Seasoning, optional
--(Japanese seaweed seasoning – See tip below)
1 (1/2-pint jar) smoked salmon sockeye strips, roughly flaked
8 thin strips red bell pepper
8 thin strips peeled celery
4 thin strips peperoncini (mild Greek green pickled jarred pepper)
2 sheets of Nori, cut in half lengthwise
1 tablespoon toasted sesame seeds

--Musubi-maker (See tip below)
--Scissors and a sharp knife

For serving (optional):
--Low-sodium soy sauce
--Wasabi paste
--Sliced pickled ginger

METHOD

Prepare sushi rice about 1.5 hours before you need it, as it has to cool down completely to absorb the sauce before you roll it into sushi squares.

Sandra's Easy Sushi Rice Recipe
In a small bowl, combine the mayonnaise and 1/2 teaspoon wasabi; set aside.


Start an assembly line on work surface to form salmon sushi squares by setting salmon, bell pepper, celery and peperoncini strips aside.  Set the sauce aside. Using scissors, cut 2 nori sheets lengthwise in half and stack them (dull side up), and set aside. Open furikake seasoning and sesame seed jars, and set aside. Place room temperature water in a small ramekin, and set aside.


To assemble, lay a halved nori sheet down, and place musubi-maker with the inside moistened with water (without the lid) crosswise over the middle of the nori sheet. Use a small spoon to place cold sushi rice into the mold (about 1/3 full with sushi rice when pressed). Use the musubi-maker handle (with the bottom moistened) to firmly press down on the rice. 


Spread the rice with a thin layer of sauce, sprinkle a thin layer of furikake; layer lengthwise ¼ of smoked salmon flakes, 2 strips of red bell pepper, 2 strips of peperoncini and 2 strips of celery on atop, and sprinkle with another thin layer of furikake, then another layer of pressed rice until the mold is about ¾’s full; pressing firmly with the moistened musubi-maker handle one final time.  


Hold the handle down with one hand, and use the other to pull the mold upward; hence un-molding the salmon sushi square log. 


Tightly wrap the nori around the rice, moisten where the edges meet on top, and gently press to adhere it. Repeat 3 more times.


Using a moistened sharp knife, cut each roll crosswise into 4 equal squares (wipe knife after each cut and dip into cold water), and plate sushi squares, then sprinkle each of them with sesame seeds. Serve at room temperature with soy sauce, wasabi and/or pickled ginger if desired. ~ Enjoy!

~~~~~~~~~~~~~
Tip:  I purchased the Musubi Maker and Furikake seasoning at: http://www.amazon.com/Spam-Musubi-Sushi-Press-K5SPS/dp/B000FWOB5S/ref=pd_sim_k_1) – although most use a spam can for molding sushi squares.

SANDRA’S JAPANESE HOT and SOUR SOUP

I like to prepare this hot and sour soup
ahead of time to allow the vegetables and tofu 
to marinate at room temperature for 30 minutes,
then just reheat and serve...
Servings: (8 to 10)
Prep: 5 Mins.
Cook: 30 Mins.
Stand: 30 Mins. to marinate, then reheat and serve

INGREDIENTS

2 qts. (8 cups) chicken stock
3 boneless pork chops, thinly sliced
2 garlic cloves, minced
3 tablespoons low-sodium ginger soy sauce (from Fred Meyer)
1 (15 oz. can) peeled straw mushrooms, drained, and cut in half (or sliced shiitake)
1 tablespoon red chile paste
1/2 teaspoon white pepper (or black)
4 tablespoons rice vinegar
1 (5 oz. can) sliced bamboo shoots, drained, and sliced into quarters
1 (15 oz. can) baby sweet corn cobs, drained and sliced
1 (5 oz. can) sliced water chestnuts, drained and cut into strips
1/2 cup fresh Alaska grown mung been sprouts (from Fred Meyer)
4 tablespoons cornstarch
4 tablespoons water
2 eggs, beaten
1/4 lb. firm tofu, sliced into 1”x1/4” strips
1 teaspoon sesame oil

Garnish:
1 green onion (green parts only), finely sliced

METHOD

Bring stock to a boil in a medium-large saucepan, add pork, garlic, soy sauce, mushrooms, and chili paste, then reduce to simmer for 10 minutes.

Add white pepper, rice vinegar, bamboo shoots, baby corn, water chestnuts, and fresh bean sprouts; simmer 10 minutes.

Mix cornstarch with water, and slowly drizzle slurry into soup while stirring.

Bring back up to a simmer, and drizzle eggs in a very thin stream over the surface of soup while stirring.

Let soup stand for 10 seconds before gently folding in tofu, and stirring in sesame oil.

Let soup marinate at room temperature for 30 minutes, then reheat and serve garnished with sliced green onions. ~ Enjoy!

SANDRA'S HOMEMADE YOSHIDA SAUCE

A very tasty Asian flavored
sauce that I use in many, many of my recipes...
Yields: (Appx. 4 cups)
Prep: 10 mins. |
Cook: 20 mins.

Posted by Sandra

INGREDIENTS:

2 cups low-sodium soy sauce
¾ cup dark brown sugar, divided
¾ cup white sugar, divided
½ onion, grated
1 inch of fresh ginger, grated
1 garlic clove, grated
1 cup honey (for homemade recipe click here:  Alaska Fireweed-Clover Honey)

METHOD:

Combine soy sauce, ½ cup dark brown sugar, ½ cup white sugar, grated onion, ginger, and garlic to a large saucepan. Bring mixture to a boil, and then reduce heat to low and simmer for 15 minutes. Pour the remaining dark brown sugar and white sugar, and honey into the saucepan. Bring to a boil (the mixture will rise and foam), when it doubles in size, remove the pan from heat, and cool.


~~~~~~~~~~~~~~~~~~~~~~~


Tip: You can use this as a marinade for most types of meat, poultry, or seafood; as a sauce addition, or where I incorporate this in many of my recipes. – Enjoy!

LinkWithin

Related Posts Plugin for WordPress, Blogger...